Monday 8 June 2015

Resistance is futile

More progress has been accomplished! Surprising I know!

To pick up where I left off, I did indeed get more of my beloved Army Painter - Matt White primer spray;


As well as a little bit of Necron stuff...


Ok I lied, it was more than a little, I failed to resist on epic proportions;


So I yet again have somehow managed to add another faction to my collection whilst in progress of my other projects, I do wonder if my "to paint" pile will actually ever get any smaller. But anyway, on to my current Tyranid batch.

I had little to no problems with the assembly of this batch, apart from issues with the finecast and the super glue sticking my fingers quicker than it did the finecast! I did also manage to snap a spore mine, which was then binned, and after fully painting this batch, my god decided to snap another when jumping on my bed where the box of models were placed! But I managed to glue that one back onto the base thankfully. So after that mishap, here is my new addition to my ever-growing swarm;

Tyrannofex not shown as it was already finished early for a painting competition.
And for some close ups;


I am particularly pleased with how the biovores came out, the fleshy parts were done with a simple base layer of Cadian fleshtone, washed with Carroburg Crimson, and the lightly drybrushed with Kislev Flesh. Very simple, yet very effective!

With these additions, my current army size is around 2500 points with all upgrades etc, which is a fair sized swarm, but I still have plans to add to it, after I have done some necrons of course! So expect to see some necrons in future posts.

Keep on painting!


Sunday 10 May 2015

The Swarm Grows!

Here we are again with another post!

I have managed to complete another batch of my beloved hive fleet, adding some psychic onslaught to my forces.

Erebos additions.

As you can see from the above picture, this batch saw the following added to my swarm;

3x Zoanthropes
3x Raveners
1x Maleceptor
16x Termagants

With these additions to my force, I can finally see my swarm slowly coming together, though it still has quite a way to go to get it to where I want to to be, which means a lot more models to get, build and paint, and of course a lot more blog posts! But Rome was not built in a day.


I find the main time consumer on this rather quick paint scheme to be the skin and shells (probably as should be expected), once they are out of the way, everything else seems to just fly by, though this gives me little comfort know I have to paint around 66 more of the little guys pictures above.


The brains of the psykers look lovely and gooey thanks to a simple layer, wash and drybrush highlight, followed by Ardcoat for the gooey look, Sadly though, after this batch was finished and I moved onto the next batch for priming, I ran out of primer for these poor guys;


So now I must order more before I can continue, however this poses a problem for me, as I can never JUST order primer / paint when making an order, I always end up getting some miniatures too, which is why I am quite worried this time, as the new Necrons have caught my eye (probably partially from my love of Tomb Kings too), so could this simple primer purchase turn into another army to paint?

DARN YOU PLASTIC CRACK!

See you again soon!

Thursday 30 April 2015

Hive Fleet Erebos


It has been quite a while since I last posted!

Work has been busy the past couple of months leaving me with little time to paint my miniatures. However I have managed to paint some of my Tyranids! So at the moment, my painted and ready to play swarm consists of;

3x Venomthrope
3x Ravener
3x Warriors (one of which is a Tyranid Prime)
1x Trygon Prime
1x Swarmlord

And here are some pictures of described swarm!;

The whole bunch


Warrior from left.
Warrior from right


As can be seen, the colour scheme is different to the original few tyranids I posted at the start of this blog, this is purely because I felt I wanted to create my own "dark" colour scheme, so what better than the colours of Erebos from MTG!
               I am currently in the process of painting up another chunk of the swarm that I have pictured in my head, a sneak peak of which, can be seen below!;

Working on the skin.
This is a rather small update considering the time I have been away, but I will post progress pictures as this next batch comes together, along with the general method for achieving the look I have on them, I would like to break it up by model (So warriors, raveners etc), but as I batch paint this can be difficult to do, but I shall try my best!

Until next time!

Tuesday 27 January 2015

And the Tomb Kings rode to war.

Good evening gamers! I have had a rather productive time since my last post, in which I think I have managed to whack out the skeletal horsemen in quite a reasonable time frame, and as promised, more pictures along side my painting process, as to provide more of a step by step guide in case anyone is interested in how I go about painting my tomb kings exactly. So here we go!;

Step 1,2 &3
1. Glue some sand to the base of the mini's after construction.
2. Base coating them with a spray of Army painter - Matt White.
3. Wash whole model (including base) with Citadel - Seraphim Sepia.


Step 4,5 &6
4. Paint the spear shafts, sword handles, banner poles etc with Citadel - Mephiston Red.
5. Paint the spear tips and bases with Citadel - Hashut Copper.
6. Wash the whole spear with Citadel - Agrax Earthshade.


Step 7,8,9,10,11 & 12
7. Drybrush highlight all copper bits with Citadel - Runefang Steel.
8. Wash the newly highlighted copper with another wash of Citadel - Agrax Earthshade.
9. Paint all bits that are to later be painted gold (helmet trims, shield skulls and rims etc) with Citadel - Mournfang Brown.
10. Paint all bits that are to later be painted turquoise with Citadel - Macragge Blue.
11. Paint scripture papyrus / banner flags with VGC - Bonewhite.
12. Wash ropes / bandages with Citadel - Agrax Earthshade.


Step 13 & 14
13. Paint all blue based bits with Citadel - Sotek Green.
14. Wash scripture papyrus / banner flags and the front face of the shield with Citadel - Agrax Earthshade.


Step 15,16 &17
15. Highlight turquoise on the banner and on helmet flaps with a mixture of VGC - Skullwhite and Citadel - Sotek Green.
16. Highlight scripture papyrus / banner flags with VGC - Bonewhite.
17. The details on the banner were painted using a mixture of VGC - Skullwhite and Citadel - Sotek Green (On the bonewhite background parts), and with VGC - Skullwhite (On the turquoise backround parts).


Step 18,19,20 &21
18. Paint all parts that were previously coating in brown Citadel - Ghenna's Gold.
19. Drybrush highlight all gold parts with Citadel - Runefang Steel.
20. Wash all gold parts with Citadel - Seraphim Sepia.
21. Use multiple watered down layers of VGC - Heavy Brown to build up the base  rim colour.


And there we go! That is a step by step guide to how I paint my Tomb kings, overall I enjoyed painting these, much like the skeletal spear men in terms of process and details, and of course a final picture(s) the finished product;


Next up on my list is either my skeletal archers, or possibly a trygon prime!

o/


Tuesday 20 January 2015

New desk setup and finally skeletal warriors done!

Evening all! I must apologize for the time between this update and my last post, sadly the holiday came to an end and it was back to work, so the times at which I could paint were far and few in between! But here we are, with another update!

A little side project of mine which I thought may interest some of you was the readying of my new permanent painting area (I know I find it interesting to see how and where others paint, though perhaps I am just odd.), as I got tired of manning the dining room table, and then having to shift my paints etc when it came to dinner time, so I went out and bought a desk!

My hobby area.

Quite a simple setup, draws used to store models to do, shelves for boxes not yet opened. If you happened to notice the air compressor in the left hand corner, and are wondering the specs etc, worry not! I shall cover the specs of it and my airbrush when I post tyranids, as they are what I majorly use it for. Now onto the Tomb Kings!

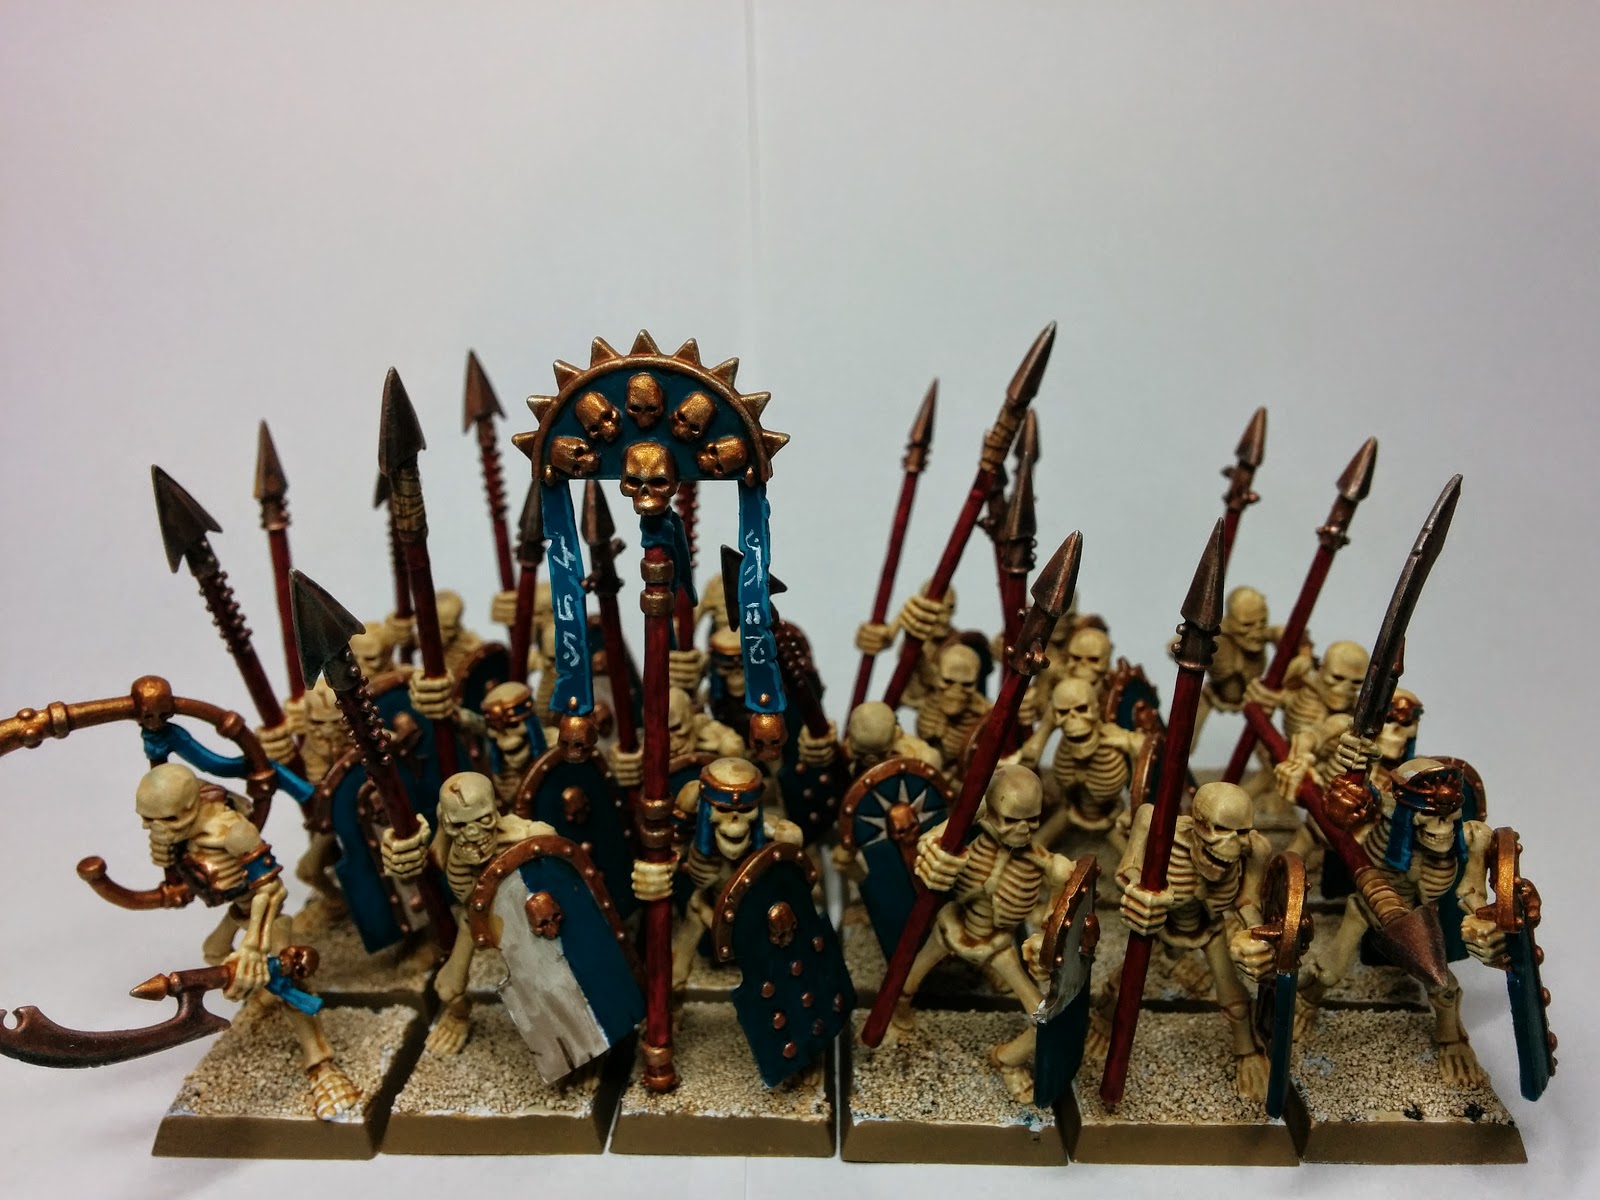
Frontal view
Left view
Right view


As can be seen, it is the same as the two complete models I previewed in my last update, with the odd difference depending on the models, such as the shields with parchment attached to them, they were simply done with a base of VGC Bone White, washed with Delvan Mud and then highlighted with VGC bone White, and lastly the scriptures on the parchment were some 'random' freehand scribbles using VGC black.

Scriptures on shields
Close up


The main 'stand out' models from this group are the champion, banner bearer and musician, more so the latter two, mainly because of the detail and difference to the standard skeletal warrior;

Champion, Banner bearer & Musician


However these were all painted in the same fashion as you would expect, with one or two added extra's, such as the cloth for the banner / on the musicians instrument, both of which were done the same way as the shield, but minus the delvan mud wash and in its place a fine edge highlight, this allowed for a more crisp feel, as well as differentiating the material to how it looks on the shields. The scriptures on the banner were done in the same manner as on the shields, except using VGC Skull White this time.

That is all I have for now. I plan to next move onto the horsemen, which hopefully shouldn't take as long, however I will change the structure of how I do things slightly, as I have noticed I haven't really laid out my exact painting process, so I will document each major step of the horsemen in my upcoming posts! So that you know exactly what I did to achieve the look I get, in case anyone has the crazy idea of drawing inspiration from my painting!

See you soon!


Saturday 3 January 2015

Do Tomb Kings celebrate new year?

I'm not so sure they do, but I know I do! So happy new year and all the best to you readers!

After my last post, I set to work on priming my tomb king battalion (Army painter - Matt white, for those interested), which did not take too long, given the quality of the spray, truly the best primer I have encountered thus far, however it did leave a nice white coat on other parts of the garage! (Probably my bad, woops!). After doing so I proceeded to wash the whole army in Seraphim Sepia, but sadly I ran through a whole bottle of the stuff! So I am await more to be delivered, but here is the progress thus far;
The whole army thus far.


Archers and horsemen.
Warriors and chariots.


It really does amaze me how one wash can make the models look that good. It certainly is to a tabletop standard once a few details have been added to the weapons etc, however I prefer to drybrush Ushabti bone onto the skeletons after this wash, as I feel it helps make them stand out as well as clean them up a little, which can be seen below;

Drybrushed mini's.

As you can probably see in the background of the above picture, I got a little excited and decided to paint a couple of them up fully, just to get an idea of how the finished product will look, and luckily for you (or not depending on your opinion!), I took a couple of pictures of them close up;

Two close up
One tilted towards light.
I am quite happy with how these came out, though I may change a couple of things on future models, for example, the gold rim on the shields, on these models I applied a base layer of Scorched Brown, followed by a layer of Ghennas Gold, then a drybrush highlight of Runefang steel, onto a wash of Delvan Mud, and then finally a drybrush of Ghennas gold to brighten it up a little (it looked too copperish for my tastes). In the future though, I will probably try washing it with Seraphim Sepia, as from what I have seen, it doesn't 'dull' the gold as much.
            After the completion of the mini's above, and no more Seraphim Sepia (Gogo Element Games order!), I decided to move onto batch painting the shields;

The backs of all 29 shields.
A close up.

The wood effect was achieved simply by using VGC Khaki as a base, followed by a wash of Delvan Mud. As for the copper, it is a base of Hashut Copper, followed by a wash of Delvan Mud (WOO FOR WASHES), though I still need to drybrush highlight it with Runefang Steel and then a final wash of Hashut Copper. The top rim of the shield, which will eventually be gold, has only been based with Scorched Brown thus far, as has the golden bits of the fronts of the shields;

Based with brown ready for gold application.

I intend to do most of the detail on the front of the shield once I have finished the detail on the back and then glued it onto the model, purely because I find it much easier to paint / handle this way. The army is coming together at a reasonable speed, so do keep a look out for further posts!

Expect to see the warrior & horsemen complete or very close to next time!

Until we meet again.


Monday 29 December 2014

Chocolate, alcohol and Warhammer. Best Christmas.

Merry (Belated) Christmas!

Hopefully you have had a good Christmas, eaten far too much and drank more than a fish, or perhaps I am just describing my adventures, but I digress. One of the main inspirations to start up this blog was to keep me motivated with painting my armies, and after just getting a massive haul of Warhammer, what better time to start!

Tyranids to add to my swarm.
Tomb kings to start my venture into the fantasy world.
So where to start! That was indeed the question. In the end I decided to crack open the Tomb king battalion and start things off with that. It took me the best part of two days to clean, assemble, base and prime all the models contained in the box, as a side note, I now strongly dislike skeletal horses, mold lines everywhere! But without further ado, the assembled battalion;

Assembled and ready to prime!
I am sure perhaps some of the tomb king players who are reading this blog of mine are probably thinking now "Spears?! Why the heck has he used spears?", quite simply, because I think they look far better than the one handed weapons, I don't play super competitive, so even though the other one handed weapons are better in terms of game play, I have equipped them with spears as they are more aesthetically pleasing to me, plus anyone who I play against will allow me to field them as if they were equipped with other one handed variants.

Next will be the painting! Woo, they will be coming to life... Again?..

See you next time!